How to connect to BizTalk Management database (BizTalkMgmtDb) via BizTalk API?

Written by stevey on September 12th, 2014

When calling Microsoft.BizTalk.ExplorerOM.BtsCatalogExplorer.ConnectionString and assigned it a connection string like
“Data Source=sqlservernameorIP;initial catalog=BizTalkMgmtDb;user id=userid;password=pwd;” providerName=”System.Data.SqlClient”

I would get an error even I know the credential is correct and the SQL Server is setup with Mixed mode so it will take both SQL server authentication and Windows Authentication:
Login failed. The login is from an untrusted domain and cannot be used with Windows authentication.

With the same user credential, I can connect to other database on the same server if I don’t use BizTalk API call. That indicates that the BizTalk API only accept Windows authenticated domain user account.

Then, how will I pass a domain user account through web?
1) Go to IIS where the web application is hosed.
2) Select the ApplicationPool for the app and click on Advanced Settings
3) Select Identity and change it to use Custom Account (from Built in Account). Click on Set and enter a domain account; you must enter the domain name such as TGIF\syang; this domain account must exist and must have proper access to the server where the BizTalk database resides.
4) If the domain account has not been given proper access to the BizTalkMgmtDb, now it is time to go to the database server, expand the Security folder then select the Logins. Add TGIF\syang to Logins as new user if it is not already there.
5) Then you must make sure the user is mapped to the database with proper role. This is done by clicking on User Mapping page after you bring up the user’s Properties. Select the BizTalkMgmtDb database by checking the Map box, then in the “Database role membership” window below, check BTS_Admin_Users.

Then, is it true that the connection string with a sql server user account no longer needed?
No, it is still needed. After I made the changes in IIS and was able to connect to the BizTalk Explorer, I intentionally passed in an invalid userid to the sql server connection string as in [“”Data Source=sqlservernameorIP;initial catalog=BizTalkMgmtDb;user id=userid;password=pwd;” providerName=”System.Data.SqlClient”], immediately, I got an error from BizTalk API call where it initializes the connection to BizTalkMgmtDb.

So, in summary, BizTalk Explorer API requires:
1) An authenticated and authorized Windows domain account to access its management database (where information like Receive Locations, Ports, etc reside)
2)If the application is a web application hosted in IIS, IIS Application Pool must be setup using Custom Account instead of the default Built-in Account
3)When passing in a SQL server connection string, this connection must be set to use Integrated Security or SQL server authentication with a user that is grant proper access. If using SQL Server authentication, steps 1 and 2) are still needed.

 

good reference on abstract class vs interface

Written by stevey on August 29th, 2014

This reading really makes it crystal clear about the similarity and difference between an abstract class and an interface http://msdn.microsoft.com/en-us/library/scsyfw1d(v=vs.71).aspx and it is easy to read. Here are the key points I took away from this casual reading:

  • Abstract class and interface both are to be inherited to be useful – this is one similarity.
  • The differences are many:
    • One subclass can inherit only one abstract class but can multiple interfaces or one base class + one or more interfaces.
    • Abstract class can have implementations but Interface does not have implementation.So if you want to have complete control of how a method is implemented, you build an abstract class to include it; otherwise, use interface to allow the inheriting class (subclass) to implement their own; in this sense, an abstract method in an abstract class is acting like a public method in an interface – they both must be implemented or overriden in a subclass.
    • An interface can be passed as an argument or initiated as an object such as:
       void GetEmailTemplate(ITemplate t) 
                     { //implementation ;
                     } 
      
       or  void SaveEmailTemplate()
      {
             IEmailTemplate t=new EmailTemplateClassThatInheritTheInterface(); 
             t.DoSomethingThatIsContractedToDoInTheInterface();
      
      
      }
      

      But an abstract class has no such freedom.

    • Interface has no knowledge and control of how its contract methods will be implemented; only thing for sure is all its public methods must be implemented in the subclass. If viewing the interface as a universally observed law – “crimes must be punished”, then while different countries must enforce the punishment but implementation of punishment can vary greatly, such as Singapore can canning you for spitting on street while other country just jails you even you murdered people, like in US.
  • So, in designing a solution, if I want to have some control over certain core operations of the classes, I would wrap those base methods with my desired implementations in an Abstract class so all the subclasses inheriting from it will automatically have my implementations, no kidding around.
  • And if I want to allow certain methods to be implemented in a subclass that I don’t give a damn, then I will add a few virtual methods in my abstract class – that give me some of those Interface power and flexibility; virtual can have some basic implementation for subclass to override with its own implementation or use directly without second thought.
  • Another concept is an Abstract method, what about that? Well, think this way, you want to force a subclass that inherits your abstract class to behave like inheriting from an interface (but you don’t want to use an interface because you want to have a tight grip on certain base implementations), what will you do? Yes, an abstract method – there is no implementation in base class but subclass must override it with its own implementation.


The bad (might be good to some) attribute introduced in MVC4 – [InitializeSimpleMembership]

Written by stevey on August 21st, 2014

Yesterday I deployed a MVC4 app to Winhost and got this error below when I clicked on “Log In” or “Register”, which I didn’t when deployed to local IIS.

A network-related or instance-specific error occurred while establishing a connection to SQL Server. The server was not found or was not accessible. Verify that the instance name is correct and that SQL Server is configured to allow remote connections. (provider: SQL Network Interfaces, error: 26 - Error Locating Server/Instance Specified)

I had seen such error before; mostly the error was due to some misspelled SQL server name or firewall blocking remote access, etc. I checked my SQL server connection strings for both SqlClient and Entities Framework model and were able to connect to the remote SQL db hosted at Winhost. When I submitted a support ticket to Winhost tech team, their server side log showed that my app tried to connect to a SQL Express instance which they don’t support. How strange was that? I do not use SQL Express and my database which contains the ASP.Net Membership objects resides on a full version local SQL Server, not Express. There is no place in my web.config that has anything to do with SQL Express instance. So I examined the Controller codes where the Log In link is clicked; here it was, the new “InitializeSimpleMembership” attribute on the AccountController class which was created automatically by my selecting the “Internet Application” MVC4 project template. This was something new introduced by MVC4 team at Microsoft, where a bunch of genius are always trying to come up with some dummy robot codes to  make everything so automatic – by “simply” looking for a SQL Express db to initiate the Membership provider for Web.Security; this “InitializeSimpleMembership” attribute, as it turns out, was the only culprit for all these non-simple headaches when you deploy your site to hosting server that usually do not support SQL Express. And there was no warning or error when I used the Publishing wizard from VS2012 to deploy the site to Winhost.

The fix? Simply commented out the attribute, as shown below,and re-deployed to Winhost; then everything works!

[Authorize]

  //[InitializeSimpleMembership]
    public class AccountController : Controller
    {
        //
        // GET: /Account/Login

        [AllowAnonymous]
        public ActionResult Login(string returnUrl)
        {
            ViewBag.ReturnUrl = returnUrl;
            return View();


Overcame the error: The database principal owns a schema in the database..

Written by stevey on January 17th, 2014

Today I tried to remove a user from SQL server database and encountered this error:

The database principal owns a schema in the database, and cannot be dropped (Microsoft SQL Server, Error: 15138)

Followed this link from TechNet at http://blogs.technet.com/b/mdegre/archive/2010/12/19/the-database-principal-owns-a-schema-in-the-database-and-cannot-be-dropped.aspx

Here were the steps I took to drop the user “syang”:

  1. Find the schema name by running this query:
    select * from sys.schemas where principal_id=USER_ID('syang')

    which returned:

     db_owner 16384 6 (name, schema_id, and principal_id)
  2. Run this query to alter the schema name:
    alter authorization on schema::db_owner to dbo
    go
  3. Now, I was able to drop the user syang successfully by running this query:
    drop user syang
  4. To remove user login syang completely from the SQL server, run this:
    IF  EXISTS (SELECT * FROM sys.server_principals WHERE name ='syang')
    DROP LOGIN syang 
    GO
 

Mysql Database repaired after Windows 8.1 upgrade

Written by stevey on December 20th, 2013

Another disaster came with the Windows 8.1 upgrade over weekend  was discovered Monday morning when I was in desperate need for my local WordPress blog where I kept tons of valuable info for the project I have been working on. I clicked on the blog link and got an “Error establishing a database connection” message. Using that error message to search Google and returned many complaints about the same problem and basically it was that the upgrade has somehow disabled the underneath MySQL database.  Below were the steps I took to fix the problem and got my WP blog back online:

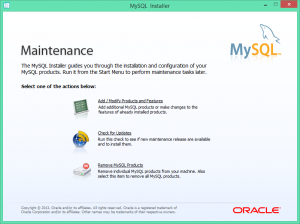
  1. Launched MySql installer and first selected Add/Modify Products and Features:

    Started MySql Installer to remove and reinstall MySql database engine

    Started MySql Installer to remove and reinstall MySql database engine

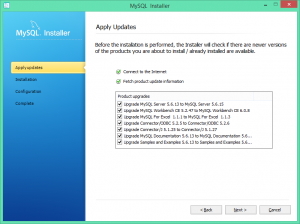
  2. First applied all the updates:
    MysqlInstaller_3
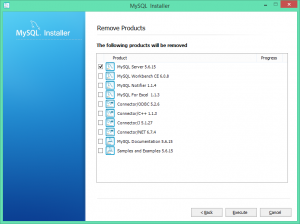
  3. After product updates were completed, trying to connect to 127.0.0.1: 3306 and still got the database not connected error; so decided that un-installing and re-installing MySql Database engine was the only option.
    MySql DB Uninstall
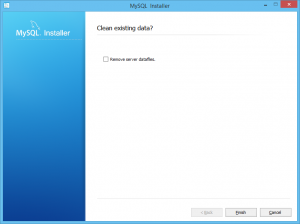
  4. When asked if to clean the existing data, did not check the “Remove server datafiles” option or I would lost all my old blogs!
    MySql DB Uninstall - 2
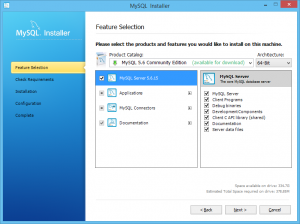
  5. After uninstalled, relaunched the MySql Installer and re-installed the MySql 5.6 Community Edition (default):
    MySql DB re-install
  6. After installation, just followed the configuration process through and added the same user account back (find user account info in wp-config.php); started the MySql Workbench and made sure it could connect to local host instance.
  7. Then that’s it! I browsed to the same work blog site and everywhere was sunshine again!
 

Fix for Wireless connection problem on a Lenovo T430 after Windows 8.1 Ugrade

Written by stevey on December 14th, 2013

Last night I upgraded my Windows 8 to 8.1 and this morning my wireless connection was lost on my Lenovo T430 machine. Remembered last time I had to manually download bunches of drivers from Lenovo site after I downgraded Windows 8 to Windows 7, so I quickly went to the site to download the driver software for Wireless LAN. I chose “Intel Wireless LAN (11abgn, 11bgn, 11ac) for Windows 8.1 (64-bit), 8 (64-bit), 7 (32-bit, 64-bit) – ThinkPad” to download and realized that the Windows 8.1 upgrade had already done that automatically and saved the driver at “grw208ww_64,exe“; without much suspect, I went ahead to run through the installation and it completed successfully but the “limited” status still showing below my wi-fi name.

I even upgraded the BIOS using the BIOS Util software downloaded from Lenovo site for Windows 8.1 but nothing changed. Well, as it turned out, Windows 8.1 upgrade automatically upgraded the driver software for wireless LAN but obviously the newer software wasn’t fully tested on every model of ThinkPad and it did not work on mine! So I ran the  “grw208ww_64,exe” and selected the “Uninstall” option to rollback. After that I located the previous driver downloaded several months earlier, “g1w216ww_s64.exe” and executed that. Immediately after the installation process completed, the yellow exclamation sign next to my wi-fi name disappeared and the wireless connection returned to normal.

So, this might be what had happened:

  • Intel heard Windows 8.1 coming and released an newest version of driver for it
  • Lenovo software QA director got inspired by the Healthcare.gov and ……the driver went live on Lenovo support site
  • Windows 8.1 upgrade tool automatically search for the latest driver from each vendor website that sold Windows 8 with their machines, found it, downloaded it and installed last night  (thank you Microsoft, appreciated that!!!)
  • But the newer does not mean better, it screwed me for 2 and half hours, plus 30 min to write this note up so it might save others from same frustration I went through.


Fix for ASP.Net webform postback error, “..Operation is not valid due to the current state of the object”

Written by stevey on November 13th, 2013

Got this error sometimes ago and, today in another application, it appeared again. This occurred when I had a relatively large number of rows of data to be posted back in a web form, said, 178 rows, in this case. Before the Postback event handler even got hit, the IIS already complained and threw this at me:

DotNetNuke.Services.Exceptions.PageLoadException: Operation is not valid due to the current state of the object. ---> System.InvalidOperationException: Operation is not valid due to the current state of the object. at System.Web.HttpRequest.FillInFormCollection() at System.Web.HttpRequest.get_Form() at System.Web.HttpRequest.get_HasForm() at System.Web.UI.Page.GetCollectionBasedOnMethod(Boolean dontReturnNull) at System.Web.UI.Page.DeterminePostBackMode() at System.Web.UI.Page.ProcessRequestMain(Boolean includeStagesBeforeAsyncPoint, Boolean includeStagesAfterAsyncPoint) --- End of inner exception stack trace --

There was no much explicit information to derive more useful details from; but it is obvious that this must have something do with the number of data post back to server since in an earlier upload, with rows less than 30, the same Postback event did not have any problem. I remembered last year I had done some research on this issue after I got this error first time while posting back a large data grid, so I dug out that application’s web.config file, and copied one line from that file and pasted it to the AppSettings in the web.config under the DotNetNuke portal root (where my app was running as a Module), and that fixed the Postback error. This time, I want to share this out loud and also it will help myself in search for solution if I will encounter the same issue again later.

So all I had to do was to add this line anywhere in the appSettings section in a web.config that is in the root of the website:

 <add key=”aspnet:MaxHttpCollectionKeys” value=”1000″/>

The number here is the maximum number of rows of a server data-bind control such as a GridView or a Repeater control. In general, however, it is not a very good practice to have a large number of rows post back over wire and that’s probably why IIS has this implicit cap on this at first place.


Changing a column to identity column and add constraint, SQL server

Written by stevey on October 31st, 2013

I had to copy two tables from a database to another last night. After the tables were Imported successfully, the identity column and primary key constraint, however, were lost. To bring them back, there was no other way but to add a new column as identity and add constraint of primary key to that column; drop the old column and rename the new column to old column’s name. Here were what I did:

–this adds a new Identity column and automatically set not null and populate it with sequence data
alter table Category
add CategoryID2 int identity(1,1)
go
–drop the old CategoryId column
alter table Category
drop column CategoryID
go

–rename column CategoryID2 to CategoryID
sp_rename ‘Category.CategoryID2′,’CategoryID’,’Column’

–now add the primary key constraint
alter table Category
add constraint PK_CategoryId primary key clustered (CategoryId)
 

This completed the transition.


wordpress update and plug-in install errors fixed

Written by stevey on August 28th, 2013

WordPress blog (yangsoft.com/blog) Update and Plug-in install errors and fixes:

Error 1: when clicking on “WordPress 3.6 is available! Please update now.”:

[Downloading update from http://wordpress.org/wordpress-3.6-new-bundled.zip…

Download failed.: Destination directory for file streaming does not exist or is not writable.

Installation Failed]

Fix:

1. Submitted a Support ticket to Winhost and got back a reference link http://forum.winhost.com/threads/wordpress-permissions.10078/
2. Somewhat useful and tried the steps below:

1) Downloaded wp-config.php to local folder; and added this entry to it:
define(‘WP_TEMP_DIR’, ABSPATH . ‘wp-content/’);
2) Uploaded it back to wp root folder.
3) Re-run the Update to version 3.6 and it worked!

3. Then installed Plug-in “wp-DBManager” which wasn’t installed before and now it went through just fine.

It turned out Winhost tech team was pretty decent by forwarding those links from its forum. Thanks!!!


Allow internet connection and access to USB drive from Hyper-V virtual machine

Written by stevey on August 28th, 2013

After Windows server 2008 R2 was installed on Hyper-V VM “VM-2008R2″, a few challenges were resolved with some efforts so they are worth noting down here:

  • Internet connection from VM:
    1. Created a Virtual Network Switch first; in order to allow VM to go to internet independently, must create an External Switch. Use “Virtual Switch Manager” of the Hyper-V Manager to accomplish
    2. There are three types of Virtual Switch, “External”, “Internal” and “Private”. Refer to this reference here at http://lennytech.wordpress.com/2013/03/29/setting-up-a-virtual-switch-for-a-hyper-v-network/ for more detail explanations about the differences.
    3. When I needed to RDP into the VM, I needed to create an “Internal Switch”
    4. Once the Virtual Switches are created, go to “Settings” under the “VM-2008R2″ and associate the Network Adapter with a Virtual Switch selected from the “Virtual Switch” drop-down list; In my case, I have created 3 switches so they are shown here: 1) ExternalWireless – this uses Intel Centrino wireless network card for wireless connection so the VM can access Internet without connecting a CAT-5 cable 2) ExternalSwitch – this uses Intel’s Gigabit network card on the laptop and requires a network cable to connect to a wireless or wired router 3) InternalSwitch – using this switch will render the VM no direct internet access but this is the only option if I want to remote desktop connect to my VM and share resources between physical and virtual machine such as Copy and Paste files, etc.
  • Access USB drive from VM Basic concept is that you need to un-mount USB drive from physical machine first and then it can be picked up and mounted onto VM. In my case, these steps were taken to get my WD Passport drive to become accessible from VM:
    1. On physical machine, plugged in WD Passport, then opened Disk Manager (Windows Control Panel/Administraive Tools/Computer Management/Disk Mnagement), clicked on the Drive letter (Drive 3) in this case for WD Passport and right click->Selected Offline
    2. Logged in to VM-2008R2 and clicked on “Settings”, then SCSI Controller under Hardware section; highlighted Hard Drive and clicked on “Add” button
    3. Selected “Physical hard disk:” and there it was, “Disk 3 232.89GB Bus 0 Lun 0 Target 0″ which was the WD Passport I just took offline from the local host machine. Clicked OK, and immediately I could hear a click sound from the WD Passport connected to USB port of the physical machine. and Back to the Disk Management console on the VM, I can now see the WD Passport listed.
    4. Credited most to this reference at http://blogs.technet.com/b/hollis/archive/2012/02/21/accessing-usb-drives-in-a-hyper-v-vm.aspx to help me get here.