Web Services

...now browsing by category


Fixing error “..an attempt was made to load a program with an incorrect format.”

Tuesday, April 14th, 2015

For a few hours I had been struggling with this error message when I tried to launch a WCF service (MyProductService.svc) from IIS7 hosted site:

Could not load file or assembly 'SomeExistingDotNetAssembly' or one of its dependencies. An attempt was made to load a program with an incorrect format.

The assembly was not built on my 64-bit machine initially so I suspected there must be something to do with that. After many failed internet searches, I decided to search for the detail error message below:

System.Web.Configuration.CompilationSection.LoadAssemblyHelper(String assemblyName, Boolean starDirective) +12857578
   System.Web.Configuration.CompilationSection.LoadAllAssembliesFromAppDomainBinDirectory() +503
   System.Web.Configuration.AssemblyInfo.get_AssemblyInternal() +142
   System.Web.Compilation.BuildManager.GetReferencedAssemblies(CompilationSection compConfig) +334
   System.Web.Compilation.BuildManager.CallPreStartInitMethods(String preStartInitListPath, Boolean& isRefAssemblyLoaded) +148
   System.Web.Compilation.BuildManager.ExecutePreAppStart() +172
   System.Web.Hosting.HostingEnvironment.Initialize(ApplicationManager appManager, IApplicationHost appHost, IConfigMapPathFactory configMapPathFactory, HostingEnvironmentParameters hostingParameters, PolicyLevel policyLevel, Exception appDomainCreationException) +1151


And that finally got me to a post from Stackoverflow which had these sacred words in it:

 Bad Image Format Exception usually means you tried to load a x64 Assembly / native DLL into an 32Bit process or vice versa a 32Bit Assembly into an x64 Process.

I felt I was close to hitting the jackpot! Then another user’s comment on IIS Application Pool setting settled the win for me:

 ...go into your IIS 7 manager console, find the application pool your app is running in, right-click on it, go to Advanced Settings, and change the Enable 32-bit Applications setting to true

And that was all it take to clear my error; after that change on the Application Pool, I clicked my “MyProductService.svc” again and now it rendered the wsdl xml nice and clean.

I am so grateful to these folks who shared and spent time to answer questions. So I reminded myself to do the same whenever I could.

ASP.NET Web service call error, “Unable to generate a temporary class (result=1)”

Tuesday, February 19th, 2013

Got this obscure error while calling a web service method that requires a Xml serializer:

Unable to generate a temporary class (result=1).\r\nerror CS2001: Source file ‘C:\\Windows\\TEMP\\qdrb02m1.0.cs’ could not be found\r\nerror CS2008: No inputs specified\r\n”}  System.Exception {System.InvalidOperationException} “


Web searches on key phrase “Unable to generate a temporary class (result=1)” returned some useful results but none could directly resolve my issue. But general direction was pointing to the proper permission of the ASP.Net surrogate identity that most likely does not have sufficient right to the local I/O where XML serialization takes place.

To prove this, I fired up a console application and called the same web service method; as anticipated, the Console app did not throw error at all. So that’s true – it is to do with the Windows account that IIS uses to run the ASP.Net process.

By default, IIS7 uses “ApplicationPoolIdentity” as the Identity for the Application pool automatically created when a new website is added to the IIS/Sites. But what’s underneath this mysterious “ApplicationPoolIdentity” – you could not even find it in Windows by looking up user accounts? Below are several things I tried and let’s see how they fared:

  1. I tried to give “Full Control” permission to ASP.NET Machine Account on c:\windows\Temp folder. Not work.
  2. Changed the app pool identity to “Network Service” (via IIS7/Site/Advanced Settings) and gave the “Network Service” full control permission to c:\windows\temp (via Windows Explorer). It worked! Then I reduced permission to only “Read, List Folder Contents”, and it still worked.
  3. Changed the app pool identity to “Local System”, of course that worked too.


So, at the end, to get rid of error “Unable to generate a temporary class (result=1)..”,  I ended up using the “Network Service” as the Application Pool identity (leave the security mode as Integrated) and granted the “Network Service” account permission “Read, List folder contents” on “C:\Windows\Temp” folder.

P.S.: after I deployed the web app to my staging web server, the error returned. The staging server is running IIS6 and the app pool identity by default was already tied to “Network Service” account. So I went directly to the c:\windows\temp folder and as I anticipated, the account did not have “read, list folder contents” permission. So I granted the permission to “Network Service” account and then it all worked!

Use reflection to retrieve SOAP Web service methods

Tuesday, February 28th, 2012

For a local object, retrieving its public methods is quite straightforward using Reflection. Sample codes below will suffice:

using System.Reflection;
using ....;
MethodInfo[] methods = typeof(LocalObjectType).GetMethods(BindingFlags.Public | BindingFlags.Static);
//sort by method names
Array.Sort(methods, delegate(MethodInfo m1, MethodInfo m2)
{ return m1.Name.CompareTo(m2.Name); });
foreach (MethodInfo mi in methods)
{ Console.WriteLine(mi.Name); }

But this does not work if my type is a proxy type to a remote web service. After some readings here and there, I finally was able to get a list of web service SOAP methods from a SOAP ASMX url. Here are the function I created to return a List of the MethodInfo:

using System; using System.Collections.Generic;
using System.Linq;
using System.Text;
using System.Reflection;
using System.Net;
using System.IO;
using System.Web.Services;
using System.Web.Services.Description;
using System.CodeDom;
using System.CodeDom.Compiler;


public List<MethodInfo> GetSoapMethods()
{
System.Net.WebClient client = new System.Net.WebClient(); string asmxUrl = "http://myservices.mydomain.com/Service.asmx";
if (!asmxUrl.Contains("?wsdl"))
asmxUrl += "?wsdl";
System.IO.Stream stream = client.OpenRead(asmxUrl);
//read service description
ServiceDescription desc = ServiceDescription.Read(stream);
//initialize a service description importer
ServiceDescriptionImporter importer = new ServiceDescriptionImporter();
importer.ProtocolName = "Soap12";
importer.AddServiceDescription(desc, null, null);
//generate a proxy client
importer.Style = ServiceDescriptionImportStyle.Client;
importer.CodeGenerationOptions = System.Xml.Serialization.CodeGenerationOptions.GenerateProperties;
CodeNamespace nmspace = new CodeNamespace();
CodeCompileUnit unit1 = new CodeCompileUnit();
unit1.Namespaces.Add(nmspace);
//import the service into the code-dom tree, this creates proxy codes that use the service
ServiceDescriptionImportWarnings warning = importer.Import(nmspace, unit1);
if (warning == 0)
{
//System.Xml.Serialization.XmlSchemas mySchema = importer.Schemas;
//Console.WriteLine(mySchema.ToString());
//generate the proxy code
CodeDomProvider provider1 = CodeDomProvider.CreateProvider("CSharp");
//compile the assembly proxy with the appropriate references
string[] assemblyReferences = new string[5]{"System.dll","System.Web.Services.dll",
"System.Web.dll","System.Xml.dll","System.Data.dll"};
CompilerParameters parms = new CompilerParameters(assemblyReferences);
CompilerResults results = provider1.CompileAssemblyFromDom(parms, unit1);
Type[] types = results.CompiledAssembly.GetTypes();
Type foundType = null;
foreach (Type t in types)
{
if (t.BaseType == typeof(System.Web.Services.Protocols.SoapHttpClientProtocol))
{
Console.WriteLine(t.ToString());
foundType = t;
break;
}
}
//instantiate proxy class
object service = results.CompiledAssembly.CreateInstance(foundType.ToString());
//this will get all the methods, public or not in the webservice
List<MethodInfo> lstMethods = service.GetType().GetMethods().ToList();
return lstMethods;
}
else
{
Console.WriteLine("Warning..");
return null;
}
}

NT AUTHORITY\NETWORK SERVICE does not have write access to ‘..\Temporary ASP.NET Files’.

Wednesday, January 4th, 2012

Got this error while trying to browse to a WCF service from IIS7: The current identity (NT AUTHORITY\NETWORK SERVICE) does not have write access to ‘D:\WINDOWS\Microsoft.NET\Framework\v4.0.3019\Temporary ASP.NET Files’. 

What happened? There must be some recent Windows updates to IIS7 that had messed up the previously security settings, but this was just my guessing. Important thing was how to fix this quickly. Found a post here granting access to IIS configuration and other directorys used by ASP.Net, and executed this line of command:

C:\Windows\Microsoft.NET\Framework\v4.0.30319>aspnet_regiis -ga “NT Authority\Ne
twork Service”

And that took care of it. “Network Service” is the identity used by the Application Pool used by the WCF service.

Allow other machine to connect to WCF Service hosted on localhost, Win7/IIS7

Thursday, November 10th, 2011

Moving along with my WCF project; today I needed to connect to the WCF services developed and published to my development machine (localhost, let’s mask its name as “dev1″) from another machine, named “user1″,  in the same network domain, and got the “Operation timed out” error 118. My localhost machine is a Windows 7 Enterprise and the WCF services are hosted on IIS7. Obviously, this was a security setting on the firewall on local machine that had blocked remote access.  Below are the steps I went through to get the problem resolved:

  1. First, I checked if I had access to default port, 80 at dev1 from user1 before I did anything; I browsed to http://dev1/Defaultsite/Default.aspx, and fair enough, not a chance – page was not rendering.
  2. On localhost (dev1), I went to Control Panel -> System and Security -> Windows Firewall -> Allowed Programs; highlighted “World Wide Web Services (HTTP) and changed settings -> checked “Domain” and “Home/Work (private)” checkboxes.
  3. Now browsed to http://dev1/Defaultsite/Default.aspx again and it worked!
  4. But when I browsed to a different port at dev1, http://dev1:8088/WcfHost/Service1.svc, I got denied again, error 118, “The operation timed out”, scary..I thought that I might need to turn on Windows Communication Foundation allowed programs inside Windows Firewall; so I did that but then it sill not worked.
  5. Is this WCF issue or port opening issue? To test that, I created a plain website, TestWeb, and hosted at http://dev1:8088/Testweb, and it still cannot be accessed from “user1″ machine. So this must be that port 8088 is not accessible from another machine.
  6. Back to Windows firewall config tool and went to Advanced Security Settings and created a new inbound connection rule, “RemoteAccessToPort8088″ to allow remote connection to port 8088 and 444.
  7. And this did it! Now I was able to access both http://dev1:8088/WcfHost/Service1.svc and https://dev1:444/WcfHost/Service1.svc from “user1″ machine.

Use makecert.exe to generate certificates for WCF service in Windows 7/IIS7

Tuesday, September 27th, 2011

-   In order for server certificate to be found by WCF wsHttpBinding’s serviceCertificate, the certificate must be stored in LocalMachine

Notes below describe the process of creating a self-signed certificate, storing in Localmachine, import it to Trusted Root CA, and then use it to sign other certificates to be used for server and client

Generate a self-signed Certificate and Root Trust it

Steps:

  1. Launch Vs2010 Command Prompt:
    Start -> All Programs -> Visual Studio 2010 -> Visual Studio Tools -> Visual Studio Command Prompt (right click and Run as Administrator)
  2. Create a self-signed (-r), private key exportable (-pe), saving to personal folder (-ss my) under local machine (Local Computer, sr localmachine), named (-n) “YangsoftCA”,common name (-in) “Yangsoft.com”  with private key file (-sv) as “YangsoftCA.pvk” and public key file “YangsoftCA.cer”Command:

    C:\Windows\system32>makecert -r -pe -ss my -sr LocalMachine -n “CN=YangsoftCA”  -sv  “YangsoftCA.pvk” YangsoftCA.cer
    Succeeded

    Password was prompted to secure the private key file

  3.  Open certificate.msc, and this certificate “YangsoftCA” appear under Local Computer / Personal store:
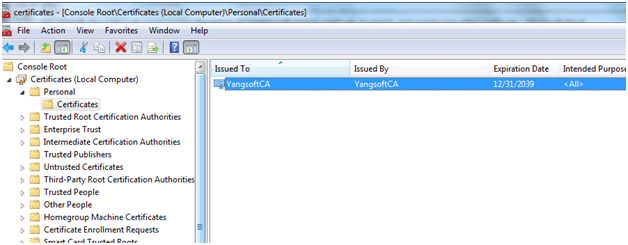
    Certificates under Certmngr.msc

    Figure 1 Certificate created by makecert.exe appears under Local Computer/Personal folder

  4. We intended to use this certificate as root level certificate authority so it can be used to issue chain trusted certificates for encrypting communications between server and client, as well as authenticating web clients that are going to access the WCF service hosted on the server. At this point, when I double clicked on the certificate and opened up the property window, it said that the certificate authority was not trusted, as shown in Figure 2:
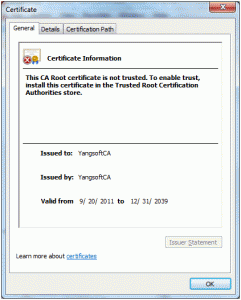
    Certificate not root trusted

    Figure 2 MMC - certificate not yet trusted

  5. To make this certificate the root of the trust chain, imported the YangsoftCA.cer file into the Trusted Root Certificate Authorities store (right-clicked on the certificate, copied and then pasted into Trusted Root Certificate Authorities) ; once I did that, now when I went back to the personal store and opened the “YangsoftCA” certificate, the status changed to “OK”, as shown in Figure 3.
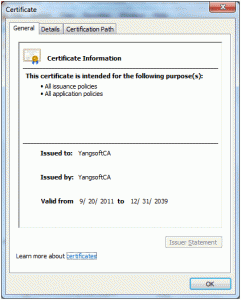
    Certificate root trusted

    Figure 3 Certificate imported to Root Trusted CA

  6. Now, I can use it to issue other certificates down the trust chain.

Use the Root Trusted Certificate to Issue Chain Trusted Certificates

First, used the YangsoftCA to sign a certificate to be used on server-side; as it is to be used for the server where WCF service is to be hosted, the signed-certificate needed to be saved into local computer:

Command:

C:\Windows\system32>makecert -n “CN=SignedByYangsoftCA” -iv “YangsoftCA.pvk” -ic “YangsoftCA.cer” -pe -ss my -sr localmachine -sv “SignedByYangsoftCA.pvk” SignedByYangsoftCA.cer

Explanation of switches:

  1. The order of switches does not matter
  2. –iv and -ic: we used the private and public key files of the Root Trusted CA, “YangsoftCA” to sign this certificate
  3. –pe: make this new certificate’ private key exportable, which is saved to the file specified in –sv, “SignedByYangsoftCA.pvk”
  4. –sv: private key file of this certificate
  5. –ss: store name my=Personal
  6. –sr: store location, if not specified, it will go to “Current User” which we do not want in this case.
  7. Certificate file (or public key file): SignedByYangsoftCA.cer
  8. When this command was run, there were several prompts to enter password. First prompt was for Subject’s password (that is to protect file “SignedbyYangsoftCA.pvk”), the last prompt was for “Issuer”, which was needed to use the Issuer’s private key file, in this case, the “YangsoftCA.pvk”.

Where did it end up?

Opened the Certificates MMC, under Local Computer/Personal store, now we see “SignedByYangsoftCA”. Double click it and we can see the certificate shows as the sub level certificate under the certification path, as shown in Figure 4:
Certificate signed by Root Trusted CA

Figure 4 Certificate signed by root trusted certificate (YangsoftCA)

Assign the Certificate Signed by Root CA to Website

Now, let’s assign this certificate to the website that hosts the WCF service. There are two ways to do this. First, we can assign the server-side certificate via system.serviceModelsection in the web.config of WCF Service application, as shown in text box below:

<system.serviceModel>

<serviceBehaviors>

<behavior name=”SvcBehavior”>

<serviceMetadata  httpsGetEnabled=”true” httpGetEnabled=”false”/>


<serviceCredentials>

<serviceCertificate findValue=”SignedByYangsoftCA” storeLocation=”LocalMachine” storeName=”My” x509FindType=”FindBySubjectName”/>

<clientCertificate>

<authentication certificateValidationMode=”PeerOrChainTrust”  />

</clientCertificate>

</serviceCredentials>

<!–this line turned on logging server error that is not thrown to EventLog. Use EventVwr/Application to find more details of the behind scene error; but make sure to turn this off after debugging is done since it will impact performance–>

<serviceSecurityAudit auditLogLocation=”Application” serviceAuthorizationAuditLevel=”Failure” messageAuthenticationAuditLevel=”Failure” suppressAuditFailure=”true” />


</behavior>

</serviceBehaviors>

</system.serviceModel>

We can also install the SignedByYangsoftCA certificate to IIS and assign to the website through IIS7. In order for the certificate to be imported to IIS7, we first need to merge the private and public key files of the certificate into a single .pfx file that IIS7 is willing to receive.

Return to c:\windows\system32  and type these commands:

pvk2pfx  -pvk SignedByYangsoftCA.pvk –spc SignedByYangsoftCA.cer –pfx SignedByYangsoftCA.pfx

This merged the .pvk and .cer files into an exchangeable pfx file that can be imported to IIS7.

Install Certificate “SignedByYangsoftCA” to IIS localmachine.

  1. Start IIS7 -> Click on root folder Localhost node
  2. Double-click on Server Certificates then select “Import” from the “Action” pane to the right.
  3. Browse to c:\windows\System32\SignedByYangsoftCA.pfx; there is a place to enter password, but ignore it as this is not the password used to protect the private key file. Imported successfully.
  4. Now, go to the website where I want to assign the server certificate, click on Bindings, highlight the binding and click on Edit
  5. You can see now the “SignedByYangsoftCA” certificate is showing in the certificates dropdown list; select it and done, Figure 5.
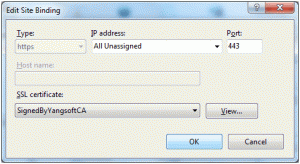
    Bind Certificate to website, IIS7

    Figure 5 Binding certificate to website, IIS7

Now that the certificate is assigned, you can remove theentry from the web.config file of the WCF service app and the service should still render to https without problem.

Client Certificate

  1. Configure IIS7 to require client to have a certificate to access the WCF service:
    1. Open IIS7 and drill down to the virtual folder where the WCF service is published, in this case, “Demo” directory
    2. Double click on SSL Settings (on Feature View)
    3. Check the “Require Client Certificate” and Apply.

    Before a client certificate was issued, I tried to browse to the .svc file and the browser returned this message, as shown in Figure 6:
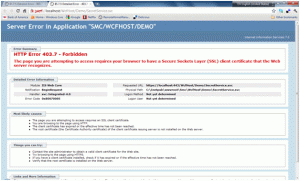
    Client certificate error

    Figure 6 If IIS7 Require Client Certificate is checked, this is client side error

  2. Now, let’s use the YangsoftCA that is already in the Root Trusted CA to issue a client certificate and then export as PFX file.Command:C:\Windows\system32>makecert -n “CN=ClientByYangsoftCA” -ss my -pe -sv “ClientBy
    YangsoftCA.pvk” -iv “YangsoftCA.pvk” -ic “YangsoftCA.cer” ClientByYangsoftCA.cer
    Explanation: generated a certificate signed (issued) by root trusted CA, “YangsoftCA”, named “ClientByYangsoftCA”, saved to CurrentUser/Personal Store, and exported private key file “ClientByYangsoftCA.pvk”.
  3. Then merged the private key and public key files into one PFX file:C:\Windows\system32>pvk2pfx -pvk ClientByYangsoftCA.pvk -spc ClientByYangsoftCA.
    cer -pfx ClientByYangsoftCA.pfx
  4. Browsed the ClientByYangsoftCA.pfx file and double clicked it, Certificate Import wizard popped up; followed the screen instruction, but ignore the password. I thought this password was the password used in protecting the private key file but when I entered it, it rejected; then I entered no password, and it took it. Is this a bug of what?

Install Microsoft Certificate Service

Wednesday, August 31st, 2011

I am in a project that requires me to use client certificate to authenticate web users who make request to using my WCF service hosted in a SSL secured website. During development phase, I just want to be able to test out the proof-of-concept, so I need to be able to self-request client certificates and grant them using localhost Certificate Authority (CA). The first step is to install the Microsoft Certificate Service on my local machine, a Windows 2003 Server. Here were the steps I went through to get this done:

  1. Went to Start->Control Panel -> Add/Remove Programs – > Add/Remove Windows Components
  2. Checked the “Certificate Services” and clicked Next
  3. CA Type: there was only two options enabled: “Stand-alone root CA” and “Stand-alone subordinate CA”.
    The two Enterprise level CA were grayed out probably due to that my machine is not an actual Domain Controller. I left the default option “Stand-alone root CA”
    alone and clicked Next
  4. CA Identity: I entered my machine name to the “Common name for this CA” box, and moved on.
  5. Next screen is “Certificate Database Settings” and just leave everything as it is (Certificate database:
    c:\windows\system32\CertLog, Certificate Database log: ibid, Shared folder: C:\CAConfig) and clicked on Next
  6. At this point, I was prompted with a Windows message “To complete the installation, certificate Services must temporarily stop the
    Internet Information Services. Do you want to stop the service now?”, answered Yes
  7. Well, then I ran into the screen that asked for Windows Service Pack 2 CD”, changed location to c:\I386 and it went through.
  8. Another Message box about enabling ASP on IIS popped up, clicked Yes, and the installation was completed successfully.
  9. To verify the CA is installed correctly, go Start->Administrative Tools ->Certificate Authority and the CA MMC should come up showing local machine as root and four folders named “Revoked Certificates”, “Issued Certificates”,”Pending Requests” and “Failed Requests”. In the next post, I will cover the steps I went through to submit Certificate requests that will be showing under the “Pending Requests” here

Reference: http://www.ehow.com/how_5143670_install-microsoft-certificate-services.html

Create and apply a self-signed certificate – Windows 7/IIS7

Sunday, August 7th, 2011

Creating a self-signed certificate on Windows 7/IIS7 was quite a different experience and it took me more time to set it up and work correctly (in retrospect, it should have been easier as most of things can be configured with GUI tool). Anyway, I don’t want to repeat the pain and relearn how this is done, let me summarize the steps here to share with others and to help me find it easier in a rainy day:

  1. Open IIS7 (If IIS7 is not available from Administrative tools, go to Control Panel – > Programs – > Turn Windows Features On or Off.
  2. Click on machine node then double click on “Server Certificates” on the IIS pane
  3. Select “Create self-signed certificate” from the “Action” pane and give a friendly name such as “WcfSecure” in this case.
  4. Once the server certificate is created, view the certificate detail and write down the Thumbprint, something like ae 8f b2 b4 b0 b6 07 16 8e 73 51 35 38 cd 6b bb 7e 1f 12 d5, and remove the spaces to become ae8fb2b4b0b607168e73513538cd6bbb7e1f12d5, copy it to notepad for later use.
  5. Next, configured the Certificate to port, using VS2010 Guid tool to generate a GUID and run VS2010 Command prompt (must run as admin):netsh http add sslcert ipport=0.0.0.0:8080 certhash=ae8fb2b4b0b607168e73513538cd6bbb7e1f12d5 appid={0270078A-39C3-47E8-845C-07D904672C71}
  6. Created a website to use the certificate so that WCF Service can be hosted in https mode; to do that click on Sites node and right click ->Add Web Site ->Named it “WcfDemo” and assign to Port 444 (443 and 442 have already been taken)
  7. Assign the certificate to the new website by choosing Binding type “https”, and pick the certificate from the Certificate drop down; certificate is on machine or server level, so there could be multiple certificates and multiple site can use same certificate.
  8. Refer to MSDN article at http://msdn.microsoft.com/library/ff406125.aspx for more in-depth detail.

It is important to note, that In IIS7, whenever a new website is created, it automatically creates a new application pool named the same as website, in this case, WcfDemo is the new app pool. And it automatically defaulted to use .Net Framework version 2.0, so be careful to manaully change it to the version that your Wcf app is using, in my case, changed to .net 4.0. Pay attention to Identity; by default, the Identity uses ApplicationPoolIdentity, other options are LocalService, LocalSystem, NetworkService, these are under Built-in account dropdown; you can also use Custom account and use the Windows user account for the application pool identity. If sqlexpress database is used for storing Membership users and if the security mode is set to use Integrated Security=true, then the
Application pool identity must use Localsystem or an “An unsecured or incorrectly secured fault was received from the other party. See the inner FaultException for the fault code and detail.” error will throw when WCF client calls the Wcf Service from this website.

If, however, the sql database uses “SQL Server Authentication” mode and passes in a predefined username and password in the sql connection string, then you can leave the default ApplicationPoolIdentity alone.

Created a self-signed certificate for WCF development – Windows 2003

Tuesday, July 12th, 2011

During the development of a WCF app, I needed to issue a self-signed certificate to my local Windows 2003 server in order to test out ways to secure WCF server-client communication. For IIS6 this was a bit trickier than IIS7. I needed to download the IIS6 resource tool kit and then run selfssl.exe to create the certificate. IIS7 could do it right on its GUI. Here were the detail steps that I went through to create a SSL-enabled hosting environment (via certificate) on my local development machine (credited this very useful posting here):

  1. Downloaded IIS6 resource kit from here http://www.microsoft.com/download/en/details.aspx?displaylang=en&id=17275 and installed it.
  2. Start ->All Programs -> IIS Resources-> SelfSSL
  3. This launched into command line:C:\Program Files\IIS Resources\SelfSSL>selfssl /N:CN=localhost:8088 /K:1024 /V:365 /S:437690215 /T
    Explanations:

    • localhost:8088 – this is where the https site is to be hosted; as port 80 already taken by another web host, I used 8088 for the new site;
    • /K: is the key size – 2048 is recommended (but 1024 worked for my case);
    • /V: days of validity – 365 is recommended (I actually used 730 or 2 years for development convenience)
    • /S: number for your web site identifier in IIS (437690215 is site id for Wcfhost, default website usually is 1, found it under the root of the website property)
    • /T makes the certificated trusted
  4. Answered “Y” at the next prompt.
  5. The message:”The self signed certificate was successfully assigned to site 437690215″
    Go back to IIS6 and now there is a Certificate under the Directory Security

For creating a self-signed certificate in IIS7, follow this article at MSDN. http://msdn.microsoft.com/library/ff406125.aspx

Consume WCF service from .Net 1.1

Sunday, January 2nd, 2011

I have struggled for the past week not being able to consume a ASMX service exposed through a WCF service app that was created on .Net 4.0 and Entity Framework. The key to make a WCF service consumable by legacy .Net app was to expose the service as an old fashion ASMX, through adding a XmlSerializerFormat attribute while building the ServiceContract interface, as shown in this sample:

[ServiceContract, XmlSerializerFormat]

public interface IService1

{

[OperationContract]

string GetData(int value);


[OperationContract]

CompositeType GetDataUsingDataContract(CompositeType composite);


}


The second key step was to make sure the web.config of the WCF service project would use “basicHttpBinding” and set endpoint address to “basic” type. When I first started out, many cited the reference from MSDN at http://msdn.microsoft.com/en-us/library/ms751433.aspx; I followed the example, and still got the “Underneath connection had been closed” error. Today, I came across another posting at http://social.msdn.microsoft.com/forums/en-US/wcf/thread/1f8c7fe9-784c-4beb-8d0f-060bf8bfc24f and that had liberated me from wondering why this damn thing not working – well, the web.config example in the MSDN article had an empty string in the address field while this social.msdn positing had a “basic” in the enpoint address;  I tried that and it worked this time! Thanks Jay R. Wren who answered a user’s question at social.msdn.com.


Here was the endpoint configuration that worked on my case:

<service name=”WcfService1.Service1″  behaviorConfiguration=”AsmxBehavior”>

<endpoint address=”basic” binding=”basicHttpBinding” contract=”WcfService1.IService1″></endpoint>


The entire web.config file that is in the WCF app project that will generate the ASMX service to be consumed by .Net 1.1 client is as below:

<?xml version=”1.0″?>

<configuration>

<system.web>

<compilation debug=”true” targetFramework=”4.0″ />

</system.web>

<system.serviceModel>

<services>

<service name=”WcfService1.Service1″  behaviorConfiguration=”AsmxBehavior”>

<endpoint address=”basic” binding=”basicHttpBinding” contract=”WcfService1.IService1″></endpoint>

</service>

</services>

<behaviors>

<serviceBehaviors>

<behavior name=”AsmxBehavior”>

<!– To avoid disclosing metadata information, set the value below to false and remove the metadata endpoint above before deployment –>

<serviceMetadata httpGetEnabled=”true”/>

<!– To receive exception details in faults for debugging purposes, set the value below to true.  Set to false before deployment to avoid disclosing exception information –>

<serviceDebug includeExceptionDetailInFaults=”false”/>

</behavior>

</serviceBehaviors>

</behaviors>

<serviceHostingEnvironment multipleSiteBindingsEnabled=”true” />

</system.serviceModel>

<system.webServer>

<modules runAllManagedModulesForAllRequests=”true”/>

</system.webServer>


</configuration>