Security

...now browsing by category


ASP.NET Web service call error, “Unable to generate a temporary class (result=1)”

Tuesday, February 19th, 2013

Got this obscure error while calling a web service method that requires a Xml serializer:

Unable to generate a temporary class (result=1).\r\nerror CS2001: Source file ‘C:\\Windows\\TEMP\\qdrb02m1.0.cs’ could not be found\r\nerror CS2008: No inputs specified\r\n”}  System.Exception {System.InvalidOperationException} “


Web searches on key phrase “Unable to generate a temporary class (result=1)” returned some useful results but none could directly resolve my issue. But general direction was pointing to the proper permission of the ASP.Net surrogate identity that most likely does not have sufficient right to the local I/O where XML serialization takes place.

To prove this, I fired up a console application and called the same web service method; as anticipated, the Console app did not throw error at all. So that’s true – it is to do with the Windows account that IIS uses to run the ASP.Net process.

By default, IIS7 uses “ApplicationPoolIdentity” as the Identity for the Application pool automatically created when a new website is added to the IIS/Sites. But what’s underneath this mysterious “ApplicationPoolIdentity” – you could not even find it in Windows by looking up user accounts? Below are several things I tried and let’s see how they fared:

  1. I tried to give “Full Control” permission to ASP.NET Machine Account on c:\windows\Temp folder. Not work.
  2. Changed the app pool identity to “Network Service” (via IIS7/Site/Advanced Settings) and gave the “Network Service” full control permission to c:\windows\temp (via Windows Explorer). It worked! Then I reduced permission to only “Read, List Folder Contents”, and it still worked.
  3. Changed the app pool identity to “Local System”, of course that worked too.


So, at the end, to get rid of error “Unable to generate a temporary class (result=1)..”,  I ended up using the “Network Service” as the Application Pool identity (leave the security mode as Integrated) and granted the “Network Service” account permission “Read, List folder contents” on “C:\Windows\Temp” folder.

P.S.: after I deployed the web app to my staging web server, the error returned. The staging server is running IIS6 and the app pool identity by default was already tied to “Network Service” account. So I went directly to the c:\windows\temp folder and as I anticipated, the account did not have “read, list folder contents” permission. So I granted the permission to “Network Service” account and then it all worked!

Asp.Net Form Postback error:Error – Operation is not valid due to the current state of the object

Wednesday, December 12th, 2012

Sometimes when there are a large number of input fields on a Asp.Net form, and doing postback, I would get this error:
“Error – Operation is not valid due to the current state of the object”

As it turned out there is a restriction on how many fields can be posted back to server and the large grid that contains a large number of textbox fields probably was the culprit. Google search returned some postings that all point to the configure setting

<appSettings>
<add key=”aspnet:MaxHttpCollectionKeys” value=”2000″ />
</appSettings>


After I stuck this line into the appSettings, the problem went away.

Smtp Permission error at Winhost

Friday, December 7th, 2012

When I was developing my ASP.Net app on local machine,  I had no problem sending email by calling directly the SMTP relay server assigned by my hosting company Winhost, with port set to 587 of course. But when I deployed the app to the winhost server, the email tool threw this exception :

Request for the permission of type ‘System.Net.Mail.SmtpPermission, System, Version=4.0.0.0, Culture=neutral, PublicKeyToken=b77a5c561934e089′ failed.

I did suspect some some security permission to Smtp related assembly and have done some search toward that direction. First I got a lead from some post via Google search and one suggested added this entry into the <system.web> section; but that did not work, so I am not going to give reference to this post.

<securityPolicy>
<trustLevel name=”Full” policyFile=”internal”/>
</securityPolicy>

Today, I went into Windost support site and did another search on their forum, and they pointed me to using this instead:

<system.web>

<trust level=”Full” />

</system.web>

Yes, that was all it needed!

Use reflection to retrieve SOAP Web service methods

Tuesday, February 28th, 2012

For a local object, retrieving its public methods is quite straightforward using Reflection. Sample codes below will suffice:

using System.Reflection;
using ....;
MethodInfo[] methods = typeof(LocalObjectType).GetMethods(BindingFlags.Public | BindingFlags.Static);
//sort by method names
Array.Sort(methods, delegate(MethodInfo m1, MethodInfo m2)
{ return m1.Name.CompareTo(m2.Name); });
foreach (MethodInfo mi in methods)
{ Console.WriteLine(mi.Name); }

But this does not work if my type is a proxy type to a remote web service. After some readings here and there, I finally was able to get a list of web service SOAP methods from a SOAP ASMX url. Here are the function I created to return a List of the MethodInfo:

using System; using System.Collections.Generic;
using System.Linq;
using System.Text;
using System.Reflection;
using System.Net;
using System.IO;
using System.Web.Services;
using System.Web.Services.Description;
using System.CodeDom;
using System.CodeDom.Compiler;


public List<MethodInfo> GetSoapMethods()
{
System.Net.WebClient client = new System.Net.WebClient(); string asmxUrl = "http://myservices.mydomain.com/Service.asmx";
if (!asmxUrl.Contains("?wsdl"))
asmxUrl += "?wsdl";
System.IO.Stream stream = client.OpenRead(asmxUrl);
//read service description
ServiceDescription desc = ServiceDescription.Read(stream);
//initialize a service description importer
ServiceDescriptionImporter importer = new ServiceDescriptionImporter();
importer.ProtocolName = "Soap12";
importer.AddServiceDescription(desc, null, null);
//generate a proxy client
importer.Style = ServiceDescriptionImportStyle.Client;
importer.CodeGenerationOptions = System.Xml.Serialization.CodeGenerationOptions.GenerateProperties;
CodeNamespace nmspace = new CodeNamespace();
CodeCompileUnit unit1 = new CodeCompileUnit();
unit1.Namespaces.Add(nmspace);
//import the service into the code-dom tree, this creates proxy codes that use the service
ServiceDescriptionImportWarnings warning = importer.Import(nmspace, unit1);
if (warning == 0)
{
//System.Xml.Serialization.XmlSchemas mySchema = importer.Schemas;
//Console.WriteLine(mySchema.ToString());
//generate the proxy code
CodeDomProvider provider1 = CodeDomProvider.CreateProvider("CSharp");
//compile the assembly proxy with the appropriate references
string[] assemblyReferences = new string[5]{"System.dll","System.Web.Services.dll",
"System.Web.dll","System.Xml.dll","System.Data.dll"};
CompilerParameters parms = new CompilerParameters(assemblyReferences);
CompilerResults results = provider1.CompileAssemblyFromDom(parms, unit1);
Type[] types = results.CompiledAssembly.GetTypes();
Type foundType = null;
foreach (Type t in types)
{
if (t.BaseType == typeof(System.Web.Services.Protocols.SoapHttpClientProtocol))
{
Console.WriteLine(t.ToString());
foundType = t;
break;
}
}
//instantiate proxy class
object service = results.CompiledAssembly.CreateInstance(foundType.ToString());
//this will get all the methods, public or not in the webservice
List<MethodInfo> lstMethods = service.GetType().GetMethods().ToList();
return lstMethods;
}
else
{
Console.WriteLine("Warning..");
return null;
}
}

NT AUTHORITY\NETWORK SERVICE does not have write access to ‘..\Temporary ASP.NET Files’.

Wednesday, January 4th, 2012

Got this error while trying to browse to a WCF service from IIS7: The current identity (NT AUTHORITY\NETWORK SERVICE) does not have write access to ‘D:\WINDOWS\Microsoft.NET\Framework\v4.0.3019\Temporary ASP.NET Files’. 

What happened? There must be some recent Windows updates to IIS7 that had messed up the previously security settings, but this was just my guessing. Important thing was how to fix this quickly. Found a post here granting access to IIS configuration and other directorys used by ASP.Net, and executed this line of command:

C:\Windows\Microsoft.NET\Framework\v4.0.30319>aspnet_regiis -ga “NT Authority\Ne
twork Service”

And that took care of it. “Network Service” is the identity used by the Application Pool used by the WCF service.

Use makecert.exe to generate certificates for WCF service in Windows 7/IIS7

Tuesday, September 27th, 2011

-   In order for server certificate to be found by WCF wsHttpBinding’s serviceCertificate, the certificate must be stored in LocalMachine

Notes below describe the process of creating a self-signed certificate, storing in Localmachine, import it to Trusted Root CA, and then use it to sign other certificates to be used for server and client

Generate a self-signed Certificate and Root Trust it

Steps:

  1. Launch Vs2010 Command Prompt:
    Start -> All Programs -> Visual Studio 2010 -> Visual Studio Tools -> Visual Studio Command Prompt (right click and Run as Administrator)
  2. Create a self-signed (-r), private key exportable (-pe), saving to personal folder (-ss my) under local machine (Local Computer, sr localmachine), named (-n) “YangsoftCA”,common name (-in) “Yangsoft.com”  with private key file (-sv) as “YangsoftCA.pvk” and public key file “YangsoftCA.cer”Command:

    C:\Windows\system32>makecert -r -pe -ss my -sr LocalMachine -n “CN=YangsoftCA”  -sv  “YangsoftCA.pvk” YangsoftCA.cer
    Succeeded

    Password was prompted to secure the private key file

  3.  Open certificate.msc, and this certificate “YangsoftCA” appear under Local Computer / Personal store:
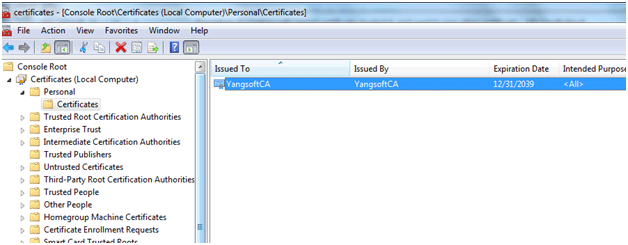
    Certificates under Certmngr.msc

    Figure 1 Certificate created by makecert.exe appears under Local Computer/Personal folder

  4. We intended to use this certificate as root level certificate authority so it can be used to issue chain trusted certificates for encrypting communications between server and client, as well as authenticating web clients that are going to access the WCF service hosted on the server. At this point, when I double clicked on the certificate and opened up the property window, it said that the certificate authority was not trusted, as shown in Figure 2:
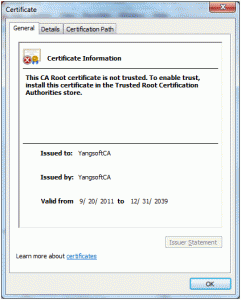
    Certificate not root trusted

    Figure 2 MMC - certificate not yet trusted

  5. To make this certificate the root of the trust chain, imported the YangsoftCA.cer file into the Trusted Root Certificate Authorities store (right-clicked on the certificate, copied and then pasted into Trusted Root Certificate Authorities) ; once I did that, now when I went back to the personal store and opened the “YangsoftCA” certificate, the status changed to “OK”, as shown in Figure 3.
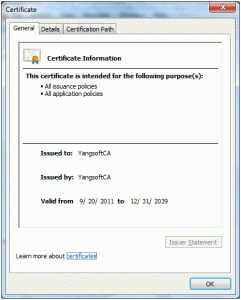
    Certificate root trusted

    Figure 3 Certificate imported to Root Trusted CA

  6. Now, I can use it to issue other certificates down the trust chain.

Use the Root Trusted Certificate to Issue Chain Trusted Certificates

First, used the YangsoftCA to sign a certificate to be used on server-side; as it is to be used for the server where WCF service is to be hosted, the signed-certificate needed to be saved into local computer:

Command:

C:\Windows\system32>makecert -n “CN=SignedByYangsoftCA” -iv “YangsoftCA.pvk” -ic “YangsoftCA.cer” -pe -ss my -sr localmachine -sv “SignedByYangsoftCA.pvk” SignedByYangsoftCA.cer

Explanation of switches:

  1. The order of switches does not matter
  2. –iv and -ic: we used the private and public key files of the Root Trusted CA, “YangsoftCA” to sign this certificate
  3. –pe: make this new certificate’ private key exportable, which is saved to the file specified in –sv, “SignedByYangsoftCA.pvk”
  4. –sv: private key file of this certificate
  5. –ss: store name my=Personal
  6. –sr: store location, if not specified, it will go to “Current User” which we do not want in this case.
  7. Certificate file (or public key file): SignedByYangsoftCA.cer
  8. When this command was run, there were several prompts to enter password. First prompt was for Subject’s password (that is to protect file “SignedbyYangsoftCA.pvk”), the last prompt was for “Issuer”, which was needed to use the Issuer’s private key file, in this case, the “YangsoftCA.pvk”.

Where did it end up?

Opened the Certificates MMC, under Local Computer/Personal store, now we see “SignedByYangsoftCA”. Double click it and we can see the certificate shows as the sub level certificate under the certification path, as shown in Figure 4:
Certificate signed by Root Trusted CA

Figure 4 Certificate signed by root trusted certificate (YangsoftCA)

Assign the Certificate Signed by Root CA to Website

Now, let’s assign this certificate to the website that hosts the WCF service. There are two ways to do this. First, we can assign the server-side certificate via system.serviceModelsection in the web.config of WCF Service application, as shown in text box below:

<system.serviceModel>

<serviceBehaviors>

<behavior name=”SvcBehavior”>

<serviceMetadata  httpsGetEnabled=”true” httpGetEnabled=”false”/>


<serviceCredentials>

<serviceCertificate findValue=”SignedByYangsoftCA” storeLocation=”LocalMachine” storeName=”My” x509FindType=”FindBySubjectName”/>

<clientCertificate>

<authentication certificateValidationMode=”PeerOrChainTrust”  />

</clientCertificate>

</serviceCredentials>

<!–this line turned on logging server error that is not thrown to EventLog. Use EventVwr/Application to find more details of the behind scene error; but make sure to turn this off after debugging is done since it will impact performance–>

<serviceSecurityAudit auditLogLocation=”Application” serviceAuthorizationAuditLevel=”Failure” messageAuthenticationAuditLevel=”Failure” suppressAuditFailure=”true” />


</behavior>

</serviceBehaviors>

</system.serviceModel>

We can also install the SignedByYangsoftCA certificate to IIS and assign to the website through IIS7. In order for the certificate to be imported to IIS7, we first need to merge the private and public key files of the certificate into a single .pfx file that IIS7 is willing to receive.

Return to c:\windows\system32  and type these commands:

pvk2pfx  -pvk SignedByYangsoftCA.pvk –spc SignedByYangsoftCA.cer –pfx SignedByYangsoftCA.pfx

This merged the .pvk and .cer files into an exchangeable pfx file that can be imported to IIS7.

Install Certificate “SignedByYangsoftCA” to IIS localmachine.

  1. Start IIS7 -> Click on root folder Localhost node
  2. Double-click on Server Certificates then select “Import” from the “Action” pane to the right.
  3. Browse to c:\windows\System32\SignedByYangsoftCA.pfx; there is a place to enter password, but ignore it as this is not the password used to protect the private key file. Imported successfully.
  4. Now, go to the website where I want to assign the server certificate, click on Bindings, highlight the binding and click on Edit
  5. You can see now the “SignedByYangsoftCA” certificate is showing in the certificates dropdown list; select it and done, Figure 5.
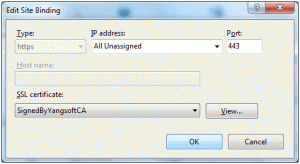
    Bind Certificate to website, IIS7

    Figure 5 Binding certificate to website, IIS7

Now that the certificate is assigned, you can remove theentry from the web.config file of the WCF service app and the service should still render to https without problem.

Client Certificate

  1. Configure IIS7 to require client to have a certificate to access the WCF service:
    1. Open IIS7 and drill down to the virtual folder where the WCF service is published, in this case, “Demo” directory
    2. Double click on SSL Settings (on Feature View)
    3. Check the “Require Client Certificate” and Apply.

    Before a client certificate was issued, I tried to browse to the .svc file and the browser returned this message, as shown in Figure 6:
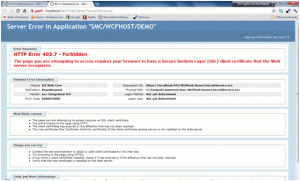
    Client certificate error

    Figure 6 If IIS7 Require Client Certificate is checked, this is client side error

  2. Now, let’s use the YangsoftCA that is already in the Root Trusted CA to issue a client certificate and then export as PFX file.Command:C:\Windows\system32>makecert -n “CN=ClientByYangsoftCA” -ss my -pe -sv “ClientBy
    YangsoftCA.pvk” -iv “YangsoftCA.pvk” -ic “YangsoftCA.cer” ClientByYangsoftCA.cer
    Explanation: generated a certificate signed (issued) by root trusted CA, “YangsoftCA”, named “ClientByYangsoftCA”, saved to CurrentUser/Personal Store, and exported private key file “ClientByYangsoftCA.pvk”.
  3. Then merged the private key and public key files into one PFX file:C:\Windows\system32>pvk2pfx -pvk ClientByYangsoftCA.pvk -spc ClientByYangsoftCA.
    cer -pfx ClientByYangsoftCA.pfx
  4. Browsed the ClientByYangsoftCA.pfx file and double clicked it, Certificate Import wizard popped up; followed the screen instruction, but ignore the password. I thought this password was the password used in protecting the private key file but when I entered it, it rejected; then I entered no password, and it took it. Is this a bug of what?

Client Certificate error – Keyset does not exist

Thursday, September 8th, 2011

A web client with Certificate called a WCF service hosted in a local machine (in development phase), secured with server-side certificate (SSL or Https:) and returned this overly simple but convoluted error, “Keyset does not exist“. What’s going on?

Well, after some readings returned from Google search, especially grateful to this two posts http://blog.mijalko.com/2008/10/wcf-iis-keyset-does-not-exist.html and http://msdn.microsoft.com/en-us/library/aa717039.aspx, this turned out to be that the “Network Service” account, which was used by the WCF service to access the resource at hosting server (even though it is just my local machine, a Windows 2003 server) did not have any permission to the private key stored in the server. That’s why the name “Keyset” – since the web client certificate only sent in a Public key and it has to matched the private key stored in the web server. So, my goal was to find the private key for this client certificate and give read permission to the “Network Service” account.

Finding the FindPrivateKey.exe was a challenge on it self, as it turned out. There might be other way to get it, but I ended up having to download a 17 MB WCF_WF sample codes package, opened the solution FindPrivateKey.sln in somewhere deep in the package and compiled it, then ran the executable using “thumbprint” switch, as shown below:

DirectoryWhereFileIsLocated>FindPrivateKey My LocalMachine -t “af 50 4e f4 3b 57 ea f0 26 a8 b0 35 bf a7 0a a7 87 ef 10 5b” -a

And it returned:
C:\Documents and Settings\All Users\Application Data\Microsoft\Crypto\RSA\Ma
eKeys\3f67f438e6678b37604ae90622d1a568_3b18c4e6-fe0f-4826-b709-bc8b80bca037.

So I went into that private key file and grant read permission to “Network Service” account; after that, I went back to the web client application, and assign the client certificate using X509FindType.FindByThumbprint option (use the thumbprint value above af 50 4e f4 3b 57 ea f0 26 a8 b0 35 bf a7 0a a7 87 ef 10 5b without spaces). Now the error disappeared and the WCF service proxy class returned to working condition.

Where to find FindPrivateKey.exe?

Thursday, September 8th, 2011

From a somewhat obscure blog here http://msdn.microsoft.com/en-us/library/aa717039.aspx, I found the source code and compiled it myself. As it turned out, this was included in a huge WCF and WF Samples download at http://www.microsoft.com/download/en/confirmation.aspx?id=21459. When it was unzipped, there were over 1200 files extracted! After that, went into folder: W:\Development\Downloads\Microsoft\WF_WCF_Samples\WCF\Setup\FindPrivateKey\CS, opened FindPrivateKey.sln and compiled it.

Then I went into the bin folder and run it like this :

DirectoryWhereFileIsLocated>FindPrivateKey My LocalMachine -t “af 50 4e f4 3b 57 ea f0 26 a8 b0 35 bf a7 0a a7 87 ef 10 5b” -a

And it returned:
C:\Documents and Settings\All Users\Application Data\Microsoft\Crypto\RSA\Ma
eKeys\3f67f438e6678b37604ae90622d1a568_3b18c4e6-fe0f-4826-b709-bc8b80bca037

Explanations of switches:

t=find by thumbprint

a=Outputs the absolute file name

Get examples of how to use FindPrivateKey from here http://msdn.microsoft.com/en-us/library/ms732026.aspx#1