ASP.Net

...now browsing by category


Installed WordPresss to Local IIS7

Monday, February 13th, 2012

Before my memory evaporates again, let’s write down the steps on how this was done:

  1. Downloaded and Installed MySql database engine, then the Workbench (acts like SQL Server Management Studio). No need to write down the version; you will always to go their site to get the latest.
  2. I already installed PHP engine the other day so no need to redo it; this time around, just go to WordPress site http://www.wordpress.org and grabbed the latest .zip file, expanded to D:\Download\Wordpress
  3. Went to IIS7 Manager and added a new site, called “wordpress” and set the physical path to d:\download\wordpress, let the site use default ApplicationPool Identity, wordpress; and set binding to port 8089 and host name “blog.yang.com”.
  4. Before I could browse to http://blog.yang.com:8089, I needed to update the local host file; to do so, browsed to c:\windows\system32\drivers\etc\hosts. The file was not editable by default; so I opened the file property and gave myself  full control permission, changed the entry there from 127.0.0.1 blog.yangsoft.com to blog.yang.com; if the entry is not there, just add one.
  5. Before I could run wp install, I needed to create a database on local mysql server. I launched MySQL WorkBench 5.2 CE ->Server Administration ->File -> New Model. Once I clicked on New Model from File menu, it automatically created a MyDB, clicked on Edit schema and changed name to myblog, selecting collation to be UTF8-UTF8_General_CI.
  6. Added a mysql user account and gave it full db rights.
  7. It is almost there. Now I went to d:\download\wordpress and opened wp-config-sample.php, replaced DB related settings to point to localhost, db name “myblog” and the newly created username. Now I was ready to run WP install, the famous 5 minutes no-brainer!
  8. Went to IIS7, browsed to wordpress/wp-admin/install.php, and it was truly amazing it did only take about 5 minutes to get the site up and running!

How to move your SQL server database from one hosting site to another

Sunday, February 5th, 2012

I normally used backup and restore tool in SQL server to move one sql server database to another server in the same network; but this does not work if your db is in a remote shared hosting site like Godaddy. To get my sql db from Godaddy shared hosting environment and move it to local sql server or a different host server, I had to use Microsoft Database Publishing Wizard. This evening I have downloaded my sql server db (called it remoteDB) to my local sql 2008 express successfully, by going through these steps:

  1. Open a VS2010 Project (existing or create a new).
  2. Go to Server Explorer ->Data Connections, right click and select “Add New Connection”.
  3. Enter remotedb.db.xxxx.godaddyresource.com to “Server Name” and select “use SQL server authentication”; enter username and password assigned by Godaddy for the database.
  4. If server name, and user credential are correct and validated, your target database will now display under the “Select or enter a database name” dropdown box.
  5. Select the database and press OK.
  6. Return to Database Connections, right click on the newly added data connection, select “Publish to Provider” from the context menu.
  7. The Microsoft Database Publishing Wizard appears; just follow the onscreen instruction to script out all database objects for the selected database.
  8. When asked to “Select an Output Location”, I selected “Script to file” and saved to a sql file at local drive. “c:\development\remote\db\sqlbackup\remotedb_published_2-5-12.sql”.
  9. when asked to “Select Publishing Options”, I selected:
    • Drop existing objects in script =True
    • Schema qualify =True
    • Script for target database =SQL Server 2008 (other options are 2005 and 2000)
    • Type of data to publish=Schema and data
  10. Click on Finish.
  11. Now, open the localhost\SQLExpress2008 and attached the remoreDb.mdf from an older version
  12. Open the .sql file “remotedb_published_2-5-12.sql” and executed the sql file
  13. Verified all data and objects were imported as current as of 2-3-2012.

If publishing to another remote sql server, you will use SQL Server 2008 Management Studio to connect to that remote database, and execute the sql file directly against that database.

Deploy .Net 4.0 Website to Local IIS7

Wednesday, January 18th, 2012

I had a website that was upgraded from .Net 2.0 to v.4.0; normally I used Web Deployment Project to pack it and deploy to remote IIS6 server using xcopy and had not encountered the need to deploy to local IIS which is IIS7 now. Today I did, and ran into a few errors before getting it to run, so I recorded the steps and fixes here to refresh myself and help others from being hassled by these again:

  1. Used Web Deployment Project to deploy the solution (Output Assemblies setting: Merge all outputs to a single assembly and Treat as library component checked)
  2. I did not check the “Create an IIS virtual directory for the output folder option as I wanted to create the website manually.
  3. Opened IIS7 and added a new website, called it “NewAdmin”; went to binding and changed port to 8081 as other default ports were already taken by other sites; left the application pool to use the default one created by the system.
  4. By default every new site created in IIS7 uses ASP.Net v2.0, obviously, changed that to .Net v.4.xxxx, and left the Integrated mode and ApplicationPoolIdentity unchanged.
  5. Now browsed to the site and got this error, “There is a duplicate ‘system.web.extensions/scripting/scriptResourceHandler’ section defined”, and some more, “There is a duplicate ‘system.web.extensions/scripting/webServices/jsonSerialization’ section defined”..
  6. Googled and read postings from here, and led me to doing the next step
  7. Removed these sections from the sectionGroup:<section name=”scriptResourceHandler” type=”System.Web.Configuration.ScriptingScriptResourceHandlerSection, System.Web.Extensions, Version=3.5.0.0, Culture=neutral, PublicKeyToken=31BF3856AD364E35″ requirePermission=”false” allowDefinition=”MachineToApplication”/><section name=”jsonSerialization” type=”System.Web.Configuration.ScriptingJsonSerializationSection, System.Web.Extensions, Version=3.5.0.0, Culture=neutral, PublicKeyToken=31BF3856AD364E35″ requirePermission=”false” allowDefinition=”Everywhere”/>
    <section name=”profileService” type=”System.Web.Configuration.ScriptingProfileServiceSection, System.Web.Extensions, Version=3.5.0.0, Culture=neutral, PublicKeyToken=31BF3856AD364E35″ requirePermission=”false” allowDefinition=”MachineToApplication”/>
    <section name=”authenticationService” type=”System.Web.Configuration.ScriptingAuthenticationServiceSection, System.Web.Extensions, Version=3.5.0.0, Culture=neutral, PublicKeyToken=31BF3856AD364E35″ requirePermission=”false” allowDefinition=”MachineToApplication”/>
    <section name=”roleService” type=”System.Web.Configuration.ScriptingRoleServiceSection, System.Web.Extensions, Version=3.5.0.0, Culture=neutral, PublicKeyToken=31BF3856AD364E35″ requirePermission=”false” allowDefinition=”MachineToApplication”/>


  8. Browsed to the site again, a different error was displayed “The page you are requesting cannot be served because of the ISAPI and CGI Restriction list settings on the Web server.” what’s going on?
  9. Well, actually this should have been done in step 3) – I need to lift the ISAPI and CGI Restrictions on the site just created. By default, IIS7 shutdowns everything; this is far different from IIS6 and earlier version, so be aware!
  10. Went back to local host node, clicked on Features View, then double clicked on ISAPI and CGI Restrictions – saw that By default ASP.Net v4.0.30319 was restricted. Changed that to “Allow”.
  11. That’s it.

NT AUTHORITY\NETWORK SERVICE does not have write access to ‘..\Temporary ASP.NET Files’.

Wednesday, January 4th, 2012

Got this error while trying to browse to a WCF service from IIS7: The current identity (NT AUTHORITY\NETWORK SERVICE) does not have write access to ‘D:\WINDOWS\Microsoft.NET\Framework\v4.0.3019\Temporary ASP.NET Files’. 

What happened? There must be some recent Windows updates to IIS7 that had messed up the previously security settings, but this was just my guessing. Important thing was how to fix this quickly. Found a post here granting access to IIS configuration and other directorys used by ASP.Net, and executed this line of command:

C:\Windows\Microsoft.NET\Framework\v4.0.30319>aspnet_regiis -ga “NT Authority\Ne
twork Service”

And that took care of it. “Network Service” is the identity used by the Application Pool used by the WCF service.

ReportViewer Error: could not load Microsoft.ReportViewer.ProcessingObjectModel.dll

Friday, December 16th, 2011

Today I have deployed a .net 4.o website which was upgraded from 2.0 sometimes ago, and found that the ReportViewer that was created back in VS2005 time no longer worked; the error returned was to do with that the Microsoft.ReportViewer.ProcessingObjectModel.dll could not be found; the ReportViewer worked normally on my local machine and I used the Web Deployment project to wrap things up and xcopy needed files to an internal web server. I guess the deployment package did not pickup what was needed for ReportViewer; as it turned out, after reading some useful posts here http://forums.asp.net/t/1723107.aspx/1 , I needed to download the ReportViewer 2010 redistributed package ReportViewer.exe from here http://www.microsoft.com/download/en/details.aspx?displaylang=en&id=6442; after I ran the ReportViewer.exe on the deployed web server, the error was fixed and gone.

Allow other machine to connect to WCF Service hosted on localhost, Win7/IIS7

Thursday, November 10th, 2011

Moving along with my WCF project; today I needed to connect to the WCF services developed and published to my development machine (localhost, let’s mask its name as “dev1″) from another machine, named “user1″,  in the same network domain, and got the “Operation timed out” error 118. My localhost machine is a Windows 7 Enterprise and the WCF services are hosted on IIS7. Obviously, this was a security setting on the firewall on local machine that had blocked remote access.  Below are the steps I went through to get the problem resolved:

  1. First, I checked if I had access to default port, 80 at dev1 from user1 before I did anything; I browsed to http://dev1/Defaultsite/Default.aspx, and fair enough, not a chance – page was not rendering.
  2. On localhost (dev1), I went to Control Panel -> System and Security -> Windows Firewall -> Allowed Programs; highlighted “World Wide Web Services (HTTP) and changed settings -> checked “Domain” and “Home/Work (private)” checkboxes.
  3. Now browsed to http://dev1/Defaultsite/Default.aspx again and it worked!
  4. But when I browsed to a different port at dev1, http://dev1:8088/WcfHost/Service1.svc, I got denied again, error 118, “The operation timed out”, scary..I thought that I might need to turn on Windows Communication Foundation allowed programs inside Windows Firewall; so I did that but then it sill not worked.
  5. Is this WCF issue or port opening issue? To test that, I created a plain website, TestWeb, and hosted at http://dev1:8088/Testweb, and it still cannot be accessed from “user1″ machine. So this must be that port 8088 is not accessible from another machine.
  6. Back to Windows firewall config tool and went to Advanced Security Settings and created a new inbound connection rule, “RemoteAccessToPort8088″ to allow remote connection to port 8088 and 444.
  7. And this did it! Now I was able to access both http://dev1:8088/WcfHost/Service1.svc and https://dev1:444/WcfHost/Service1.svc from “user1″ machine.

You have been denied access to this machine, IIS6

Tuesday, November 1st, 2011

On a Windows 2003 server machine, I had to re-install IIS6; after re-installation, I added a few websites that were created prior to the re-installation back, and suddenly all the websites were automatically flagged as “Stopped”. Tried to start one of them, and got this dreadful error “You have been denied access to this machine.” I Googled this error directly and returned no much useful information except that someone suggested looking into the Windows Event Log; so I did and the underline error was like “Cannot register the URL prefix ‘http://*:80/’ for site..”

Searching the latter error message has yielded a few more useful postings about the issue. I followed the one posted at http://support.microsoft.com/kb/890015 and resolved the problem by doing these steps:

  1. Start -> Run -> Regedit
  2. Browsed to Hkey_Local_Machine\System\CurrentControlSet\Services\Http\Parameters\ListenOnlyList
  3. There were three entries under this subkey, 0.0.0.0, 127.0.0.1:80, and 127.0.0.1:8080
  4. Returned to command line and run this command: net stop http
  5. Went back to registry, and removed from the ListenOnlyList all entries except 0.0.0.0
  6. Restarted http services by executing command: net start http
  7. Returned to IIS6 and started the website; this time, the site was started successfully.

Run .Net 1.1 Web Project in Windows 7/IIS7

Tuesday, November 1st, 2011

I have to develop and support three versions of .Net projects on one Windows 7 machine running IIS7. After installing VS2003, VS2008 and VS2010 on the machine, it was not without some struggling to get the legacy .Net 1.1 project to run seamlessly in IIS7, so it is worthwhile to write down a few key steps here:

  1. Created a .Net 1.1 website, called Net1_1 in IIS7 and selected Application pool ASP.Net 1.1 from the available Application pool drop-down. The ASP.Net 1.1 application pool was created automatically when Framework 1.1 was installed. If this application pool is not present, that is an indication that .Net 1.1 framework has not been installed or was not installed properly.
  2. Made sure that the ASP.Net 1.1 app pool “Managed Pipeline Mode” is “Classic”, which is default, instead of “Integrated”.
  3. At this point, I tried to browse to the .Net 1.1 app directly from IIS7, I got all sort of errors. They were caused by that ISAPI filter for .Net 1.1 was not  present by default in IIS7. To fix that, I selected the Net1_1 site -> Features View and double-clicked on “ISAPI Filters” icon; clicked on Add, gave it a name “Asp.Net 1.1″ and set “Executable” to be “C:\Windows\Microsoft.NET\Framework\v1.1.4322\aspnet_filter.dll”.
  4. Lifted the ISAPI and CGI restriction on the filter by going in to ISAPI and CGI Restrictions pane (accessed from Machine level Feature View) and changed Restriction from “Not Allowed” to “Allowed”.
  5. Almost done; I still got “Access denied” error after all these, why? Googled for “running .net 1.1 on IIS7″ and found a useful post at http://blogs.iis.net/rakkimk/archive/2008/03/20/iis7-running-asp-net-1-1-applications.aspx, which pointed me to download and install .Net framework 1.1 service pack 1. After that, I was able to bring the .Net 1.1 site back to live in IIS7!
  6. Another error, “Error while trying to run project: Unable to start debugging on the web server. Access is denied.”, arose when I tried to debug the .Net 1.1 project from VS2003. What’s going on? Well, it’s the notorious Windows 7 “Run as Administrator” thing! I had to run VS 2003 as administrator, open the project from VS2003, and then the error went away. What an inconvenience!

Use makecert.exe to generate certificates for WCF service in Windows 7/IIS7

Tuesday, September 27th, 2011

-   In order for server certificate to be found by WCF wsHttpBinding’s serviceCertificate, the certificate must be stored in LocalMachine

Notes below describe the process of creating a self-signed certificate, storing in Localmachine, import it to Trusted Root CA, and then use it to sign other certificates to be used for server and client

Generate a self-signed Certificate and Root Trust it

Steps:

  1. Launch Vs2010 Command Prompt:
    Start -> All Programs -> Visual Studio 2010 -> Visual Studio Tools -> Visual Studio Command Prompt (right click and Run as Administrator)
  2. Create a self-signed (-r), private key exportable (-pe), saving to personal folder (-ss my) under local machine (Local Computer, sr localmachine), named (-n) “YangsoftCA”,common name (-in) “Yangsoft.com”  with private key file (-sv) as “YangsoftCA.pvk” and public key file “YangsoftCA.cer”Command:

    C:\Windows\system32>makecert -r -pe -ss my -sr LocalMachine -n “CN=YangsoftCA”  -sv  “YangsoftCA.pvk” YangsoftCA.cer
    Succeeded

    Password was prompted to secure the private key file

  3.  Open certificate.msc, and this certificate “YangsoftCA” appear under Local Computer / Personal store:
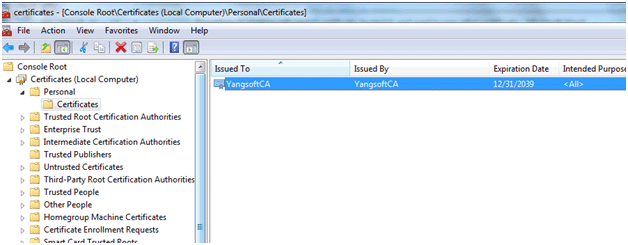
    Certificates under Certmngr.msc

    Figure 1 Certificate created by makecert.exe appears under Local Computer/Personal folder

  4. We intended to use this certificate as root level certificate authority so it can be used to issue chain trusted certificates for encrypting communications between server and client, as well as authenticating web clients that are going to access the WCF service hosted on the server. At this point, when I double clicked on the certificate and opened up the property window, it said that the certificate authority was not trusted, as shown in Figure 2:
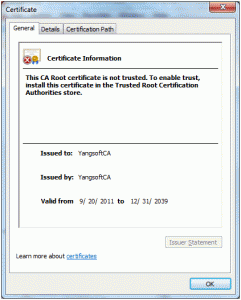
    Certificate not root trusted

    Figure 2 MMC - certificate not yet trusted

  5. To make this certificate the root of the trust chain, imported the YangsoftCA.cer file into the Trusted Root Certificate Authorities store (right-clicked on the certificate, copied and then pasted into Trusted Root Certificate Authorities) ; once I did that, now when I went back to the personal store and opened the “YangsoftCA” certificate, the status changed to “OK”, as shown in Figure 3.
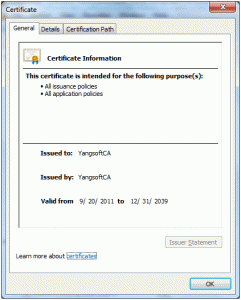
    Certificate root trusted

    Figure 3 Certificate imported to Root Trusted CA

  6. Now, I can use it to issue other certificates down the trust chain.

Use the Root Trusted Certificate to Issue Chain Trusted Certificates

First, used the YangsoftCA to sign a certificate to be used on server-side; as it is to be used for the server where WCF service is to be hosted, the signed-certificate needed to be saved into local computer:

Command:

C:\Windows\system32>makecert -n “CN=SignedByYangsoftCA” -iv “YangsoftCA.pvk” -ic “YangsoftCA.cer” -pe -ss my -sr localmachine -sv “SignedByYangsoftCA.pvk” SignedByYangsoftCA.cer

Explanation of switches:

  1. The order of switches does not matter
  2. –iv and -ic: we used the private and public key files of the Root Trusted CA, “YangsoftCA” to sign this certificate
  3. –pe: make this new certificate’ private key exportable, which is saved to the file specified in –sv, “SignedByYangsoftCA.pvk”
  4. –sv: private key file of this certificate
  5. –ss: store name my=Personal
  6. –sr: store location, if not specified, it will go to “Current User” which we do not want in this case.
  7. Certificate file (or public key file): SignedByYangsoftCA.cer
  8. When this command was run, there were several prompts to enter password. First prompt was for Subject’s password (that is to protect file “SignedbyYangsoftCA.pvk”), the last prompt was for “Issuer”, which was needed to use the Issuer’s private key file, in this case, the “YangsoftCA.pvk”.

Where did it end up?

Opened the Certificates MMC, under Local Computer/Personal store, now we see “SignedByYangsoftCA”. Double click it and we can see the certificate shows as the sub level certificate under the certification path, as shown in Figure 4:
Certificate signed by Root Trusted CA

Figure 4 Certificate signed by root trusted certificate (YangsoftCA)

Assign the Certificate Signed by Root CA to Website

Now, let’s assign this certificate to the website that hosts the WCF service. There are two ways to do this. First, we can assign the server-side certificate via system.serviceModelsection in the web.config of WCF Service application, as shown in text box below:

<system.serviceModel>

<serviceBehaviors>

<behavior name=”SvcBehavior”>

<serviceMetadata  httpsGetEnabled=”true” httpGetEnabled=”false”/>


<serviceCredentials>

<serviceCertificate findValue=”SignedByYangsoftCA” storeLocation=”LocalMachine” storeName=”My” x509FindType=”FindBySubjectName”/>

<clientCertificate>

<authentication certificateValidationMode=”PeerOrChainTrust”  />

</clientCertificate>

</serviceCredentials>

<!–this line turned on logging server error that is not thrown to EventLog. Use EventVwr/Application to find more details of the behind scene error; but make sure to turn this off after debugging is done since it will impact performance–>

<serviceSecurityAudit auditLogLocation=”Application” serviceAuthorizationAuditLevel=”Failure” messageAuthenticationAuditLevel=”Failure” suppressAuditFailure=”true” />


</behavior>

</serviceBehaviors>

</system.serviceModel>

We can also install the SignedByYangsoftCA certificate to IIS and assign to the website through IIS7. In order for the certificate to be imported to IIS7, we first need to merge the private and public key files of the certificate into a single .pfx file that IIS7 is willing to receive.

Return to c:\windows\system32  and type these commands:

pvk2pfx  -pvk SignedByYangsoftCA.pvk –spc SignedByYangsoftCA.cer –pfx SignedByYangsoftCA.pfx

This merged the .pvk and .cer files into an exchangeable pfx file that can be imported to IIS7.

Install Certificate “SignedByYangsoftCA” to IIS localmachine.

  1. Start IIS7 -> Click on root folder Localhost node
  2. Double-click on Server Certificates then select “Import” from the “Action” pane to the right.
  3. Browse to c:\windows\System32\SignedByYangsoftCA.pfx; there is a place to enter password, but ignore it as this is not the password used to protect the private key file. Imported successfully.
  4. Now, go to the website where I want to assign the server certificate, click on Bindings, highlight the binding and click on Edit
  5. You can see now the “SignedByYangsoftCA” certificate is showing in the certificates dropdown list; select it and done, Figure 5.
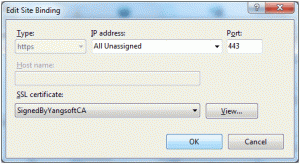
    Bind Certificate to website, IIS7

    Figure 5 Binding certificate to website, IIS7

Now that the certificate is assigned, you can remove theentry from the web.config file of the WCF service app and the service should still render to https without problem.

Client Certificate

  1. Configure IIS7 to require client to have a certificate to access the WCF service:
    1. Open IIS7 and drill down to the virtual folder where the WCF service is published, in this case, “Demo” directory
    2. Double click on SSL Settings (on Feature View)
    3. Check the “Require Client Certificate” and Apply.

    Before a client certificate was issued, I tried to browse to the .svc file and the browser returned this message, as shown in Figure 6:
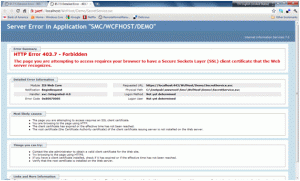
    Client certificate error

    Figure 6 If IIS7 Require Client Certificate is checked, this is client side error

  2. Now, let’s use the YangsoftCA that is already in the Root Trusted CA to issue a client certificate and then export as PFX file.Command:C:\Windows\system32>makecert -n “CN=ClientByYangsoftCA” -ss my -pe -sv “ClientBy
    YangsoftCA.pvk” -iv “YangsoftCA.pvk” -ic “YangsoftCA.cer” ClientByYangsoftCA.cer
    Explanation: generated a certificate signed (issued) by root trusted CA, “YangsoftCA”, named “ClientByYangsoftCA”, saved to CurrentUser/Personal Store, and exported private key file “ClientByYangsoftCA.pvk”.
  3. Then merged the private key and public key files into one PFX file:C:\Windows\system32>pvk2pfx -pvk ClientByYangsoftCA.pvk -spc ClientByYangsoftCA.
    cer -pfx ClientByYangsoftCA.pfx
  4. Browsed the ClientByYangsoftCA.pfx file and double clicked it, Certificate Import wizard popped up; followed the screen instruction, but ignore the password. I thought this password was the password used in protecting the private key file but when I entered it, it rejected; then I entered no password, and it took it. Is this a bug of what?

Where to find FindPrivateKey.exe?

Thursday, September 8th, 2011

From a somewhat obscure blog here http://msdn.microsoft.com/en-us/library/aa717039.aspx, I found the source code and compiled it myself. As it turned out, this was included in a huge WCF and WF Samples download at http://www.microsoft.com/download/en/confirmation.aspx?id=21459. When it was unzipped, there were over 1200 files extracted! After that, went into folder: W:\Development\Downloads\Microsoft\WF_WCF_Samples\WCF\Setup\FindPrivateKey\CS, opened FindPrivateKey.sln and compiled it.

Then I went into the bin folder and run it like this :

DirectoryWhereFileIsLocated>FindPrivateKey My LocalMachine -t “af 50 4e f4 3b 57 ea f0 26 a8 b0 35 bf a7 0a a7 87 ef 10 5b” -a

And it returned:
C:\Documents and Settings\All Users\Application Data\Microsoft\Crypto\RSA\Ma
eKeys\3f67f438e6678b37604ae90622d1a568_3b18c4e6-fe0f-4826-b709-bc8b80bca037

Explanations of switches:

t=find by thumbprint

a=Outputs the absolute file name

Get examples of how to use FindPrivateKey from here http://msdn.microsoft.com/en-us/library/ms732026.aspx#1